Data transformation: methods, workflows, and best practices

Last edited on Nov 18, 2025
Large amounts of data inundate most businesses, which sounds like a good thing. However, raw data in its original form often lacks the structure and consistency needed for meaningful analysis.
This is where data transformation comes into play.
TL;DR
- Raw data needs data transformation for meaningful analysis.
- A transformation layer adds structure and governance to data.
- ETL moves data before transformation in a separate data warehouse.
- ELT transforms data inside the destination data warehouse.
- Keep an eye out for issues with consistency, clear data models, and standardized KPIs.
What is data transformation?
Data transformation is the process of converting data from one format or structure into another, making it usable and valuable for decision-making.
Without transformation, raw data remains messy and fragmented, making it difficult to derive meaningful insights. Transformed data, on the other hand, is structured, accurate, and ready to fuel business decisions.
The data transformation process in 4 steps
Data transformation converts one materialized data asset — such as a table or a view — into another purpose-built for analytics through a series of commands or queries. Languages like SQL and Python are standard tools used in this process.
Data transformation involves several stages, each vital to preparing data for analysis.
- Discovery and profiling The journey begins with data discovery and profiling, where we assess the data’s structure, quality, and characteristics. This initial step is essential for identifying anomalies, inconsistencies, and potential issues that need to be addressed during transformation.
- Cleansing. Cleansing corrects inaccuracies, fills in missing values, and removes duplicates, ensuring the reliability and accuracy of the data.
- Mapping. Next, we map the data and its' structure according to the needs of the target system—a process known as data mapping and structuring. Here, data types may be converted, fields reorganized, or specific business rules applied. The actual transformation execution then applies these rules, converting the data into the desired format.
- Storage. Finally, we load the transformed data into a central data store, such as a data warehouse, where it becomes available for analysis and reporting.
Related content:
- Data transformation: Six critical best practices | dbt Labs
- Implementing common data transformation techniques with dbt
How companies use data transformation
Companies rely on data to understand their customers, optimize operations, and gain a competitive edge. However, the data collected from various sources is often in different formats, structures, and levels of quality. Without transformation, this data remains siloed, inconsistent, and difficult to integrate.
Effective data transformation addresses these challenges by ensuring that we integrate and analyze data from different sources together.
Example #1: comprehensive view
A company might collect customer data from multiple channels—websites, social media, and in-store transactions. Each channel may use different formats and structures, but through transformation, this data can be standardized, allowing the company to gain a comprehensive view of customer behavior.
Example #2: compliance and governance
By cleansing and standardizing data, transformation processes ensure that the data used for analysis is reliable. This is particularly important in industries where compliance and data governance are critical. For example, financial institutions must adhere to strict regulations regarding data accuracy and reporting. Data transformation ensures that their data management practices comply with these regulations, reducing the risk of legal penalties and improving operational efficiency.
Related content:
- Understanding data transformation frameworks | dbt Labs
- Understanding data transformation platforms | dbt Labs
- How AI is changing data transformation workflows | dbt Labs
What data transformation offers
Data and analytics engineers use data transformations to prepare datasets by removing invalid entries, errors, outliers, and duplicate records. Additionally, they standardize data which creates tables that serve as a reliable foundation for subsequent analyses.
A well-implemented data transformation system supports this process at scale. For small operations, a few scripts may suffice, but as data volumes grow and the number of use cases increases, a more scalable and standardized approach becomes necessary.
The value of a data transformation layer
This is where a data transformation layer comes into play—a network of transformations and routines that process data automatically, ensuring consistency and reducing the manual effort required for data preparation.
A data transformation layer not only automates and standardizes processes but also prevents conflicts between analyses and data silos that can arise in the absence of a centralized approach. It provides a single, authoritative base of models that ensures everyone in the organization is working from the same definitions and standards, facilitating collaboration and reducing unnecessary costs.
Benefits of data transformation
Why is data transformation the foundation for modern data analytics? Because it’s the baseline for increasing the data quality of your business and creating meaningful data for your end users.
- Higher data quality. Data transformation standardizes, tests, and automates raw data, ensuring consistency in formats, metrics, and aggregations. This reduces errors, enhances trust in datasets, and enables reliable decision-making.
- Reliable metric consistency. By defining and applying standardized metric calculations across models, datasets, and BI tools, data transformation maintains uniformity. This builds trust in analytics and improves the ROI of data teams.
- Reusable, complex datasets. Automating data cleaning and metric calculations generates accurate and meaningful datasets without repeated manual effort. This improves efficiency and speeds up reporting and analysis.
- Reverse ETL support. Transformation joins multiple datasets into a single, enriched data model, enabling seamless integration into reverse ETL tools. This ensures stakeholders receive timely and relevant insights where they need them
Transformation methods: ETL vs ELT
Data transformations are typically performed on data piped into a central data store, such as a data warehouse. Historically, this process has followed one of two approaches: the legacy ETL (Extract, Transform, Load) approach and the more modern, cloud-based ELT (Extract, Load, Transform) approach.

What is ETL?
ETL is the older paradigm, developed when data storage and network transfer were costly. In ETL, data is extracted from source systems, transformed according to the needs of the target system, and then loaded into a central database.
ETL: pros and cons
This method minimizes storage by ensuring that only transformed data is stored, but it is also inflexible and difficult to scale. Transformations are often scattered across different systems, leading to repeated, inconsistent work as different teams implement ad hoc queries for each new project.
What is ELT?
ELT, on the other hand, reverses this order. Data is first extracted from source systems and loaded into a data warehouse in its raw form, where it can be transformed as needed.
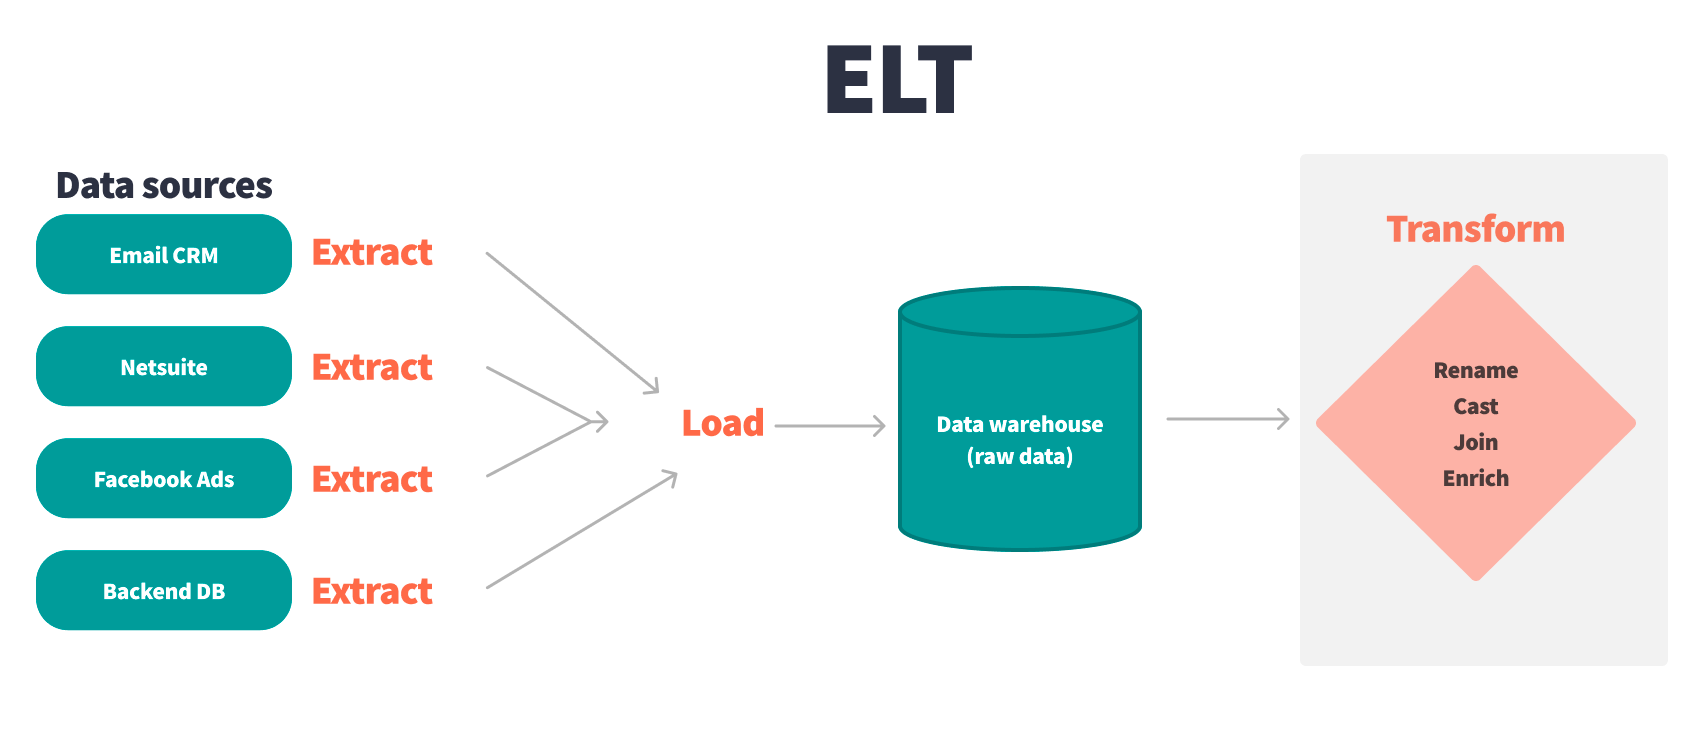
ELT: pros and cons
This approach leverages the scalability and flexibility of cloud storage and computing, making it easier to handle large volumes of data and a growing number of use cases. ELT allows for a more organized data architecture, with transformations performed directly in the warehouse, enabling a more streamlined and efficient process.
However, ELT is not without its challenges. As organizations scale, the number of dashboards, tables, sources, and end-user products increases, leading to a complex data warehouse environment. Without proper tools to manage this complexity, issues such as data inconsistency, lack of documentation, and version control problems can arise, undermining the trust and usability of the data.
Challenges of data transformation
Data transformation is fun, but tough work for analytics practitioners. The difficulty often varies given the complexity and volume of your data, the number of sources you’re pulling from, and the needs of your stakeholders. Here are some of the biggest challenges you’ll face during the data transformation process.
Consistency across multiple datasets
Ensuring datasets follow standardized naming conventions, SQL best practices, and consistent testing standards can be challenging. Without consistency, analysts risk duplicative work, misaligned timezones, and unclear data relationships, leading to inaccurate reporting.
Defining data modeling conventions
Establishing style conventions before transformation ensures datasets remain uniform across all engineers' work. Without clear guidelines, teams may create inconsistent data models, making transformations harder to scale and reducing readability.
Standardization of core KPIs
Key business metrics should be version-controlled, defined in code, and accessible within BI tools. Without standardization, different teams may generate conflicting reports, causing confusion and inefficiencies in decision-making.
Comparing and evaluating data transformation tools
Just like any other part of the modern data stack, there are different data transformation tools depending on different factors like budget, resources, organization structure, and specific use cases. Below are some considerations to keep in mind when looking for a data transformation tool.
Engineering best practices
Data transformation tools should support version control, automated testing, robust documentation, and collaborative workspaces to ensure reliable, efficient analytics development. Without these features, tracking changes, debugging, and maintaining transformations become difficult and error-prone.
Build vs buy
Teams must assess budget, resources, and technical capabilities to decide whether to develop an in-house tool or purchase an external solution. Building a tool requires ongoing maintenance, skilled engineers, and hiring considerations, which can lead to high costs and operational strain.
Open source vs SaaS
Open source tools offer flexibility and cost savings but require maintenance, while SaaS solutions provide infrastructure, support, and scalability. An open source tool may demand significant technical expertise, while a SaaS tool introduces dependency on a third-party provider and recurring costs.
Technical ramp period
Teams should evaluate whether they have the skills to use a tool’s coding language and whether business users can engage with transformation processes. A steep learning curve can slow adoption, limit collaboration, and reduce the tool's effectiveness in driving business decisions.
Data transformation with dbt
That’s where dbt comes in.
dbt is a SQL-first data transformation workflow that allows teams to quickly and collaboratively deploy analytics code using software development best practices. This gives data teams the agency, control, and visibility needed to deliver world-class data products at scale and promotes data quality and trust.
dbt has quickly become the industry standard for data transformation, especially in cloud data warehouses. By focusing on the transformation step within the ELT process, dbt enables data teams to transform data after it has been loaded into a warehouse, ensuring that the data is ready for analysis while maintaining flexibility and scalability.
dbt offers several key advantages:
- Modular transformation logic: dbt allows for the creation of reusable SQL logic, ensuring consistency and reducing redundancy across different data models.
- Automatic documentation: dbt automatically generates documentation for all transformations, providing transparency and facilitating collaboration across teams.
- Integrated testing and version control: dbt includes built-in testing and version control features, ensuring that transformations are reliable and that changes are tracked and managed effectively.
How dbt enhances data transformation workflows
While dbt Core provides powerful transformation capabilities, dbt enhances these capabilities by offering an integrated development environment (IDE) that fosters collaboration and accessibility.
- Integrated development environment (IDE). dbt provides a built-in IDE that simplifies development and fosters collaboration. Without it, teams may struggle with fragmented workflows and inefficient development processes.
- Infrastructure management. dbt eliminates the need for teams to manage infrastructure, allowing them to focus on developing transformation logic. Without this, teams face higher maintenance burdens and reduced productivity.
- Scalability. dbt scales with organizational needs, ensuring data transformations remain reliable as data volumes grow. Without this scalability, teams risk bottlenecks and inefficient processing at higher data loads.
- Collaboration. dbt enables data engineers, analysts, and business stakeholders to work together in a shared environment. Without this, siloed workflows can lead to misalignment and inefficiencies.
- Governance and compliance. dbt offers centralized access control and detailed documentation to ensure compliance with industry standards. Without these features, organizations may struggle with security risks and regulatory non-compliance.
- Automated testing and documentation. dbt automates testing, version control, and documentation, reducing the risk of errors and ensuring data accuracy. Without automation, teams face higher chances of errors and unreliable data for decision-making.
- Cost and resource efficiency. dbt reduces infrastructure costs and optimizes resource usage, allowing teams to focus on high-value tasks. Without these efficiencies, organizations may overspend on infrastructure and struggle with resource allocation.
- Faster data product delivery. dbt streamlines workflows, enabling teams to ship data products faster and improve data quality. Without this, slow delivery cycles can hinder innovation and business growth.
Conclusion
Data transformation is a cornerstone of modern data management, enabling organizations to convert raw data into valuable insights. As the volume and complexity of data continue to grow, having the right tools to manage and automate data transformation becomes increasingly important.
Further reading: data transformation in the real world
Many large organizations have successfully leveraged dbt to scale their data analytics practices:
- Condé Nast used dbt to simplify its data architecture, reducing the reliance of business users on data engineers and freeing up engineering time for more valuable projects. By standardizing their data transformation process, Condé Nast was able to streamline operations and improve collaboration across teams.
- Nasdaq leveraged dbt to overcome data engineering bottlenecks, enabling faster and more reliable data delivery. By centralizing and automating data transformation workflows, Nasdaq significantly reduced the time required to produce business-critical reports, leading to more timely and informed decision-making.
- Rocket Money utilized dbt to enhance its data analytics capabilities, allowing the company to scale its operations efficiently. With dbt, Rocket Money could automate data transformations and maintain high data quality, enabling the company to better serve its customers and make data-driven decisions more effectively.
- Siemens implemented dbt to manage complex data transformations across its global operations. The standardized approach provided by dbt allowed Siemens to maintain consistency in data definitions and transformations, ensuring that data from different regions and departments could be seamlessly integrated and analyzed.
These examples highlight how dbt not only supports but enhances data transformation processes, helping organizations of all sizes to manage their data more effectively and make better business decisions.
More about data transformation
Data transformation: Six critical best practices | dbt Labs
ETL Pipeline best practices for reliable data workflows | dbt Labs
Implementing common data transformation techniques with dbt | dbt Labs
FAQs
Get started in dbt
Join the analytics engineers building data infrastructure that actually scales.
Install dbt Wizard CLI
Get started with an agent purpose-built for analytics engineering. It knows which tool to call, which context to pull, and checks its own work before surfacing anything to you.